瓦力工厂-编程训练营

Scratch编程 Ardunio机器人搭建 Python自动化


  • 首页

  • 关于

  • 标签

  • 分类

  • 归档

Python零基础快速入门趣味教程003-循环

发表于 2018-12-24 | 分类于 Python 入门

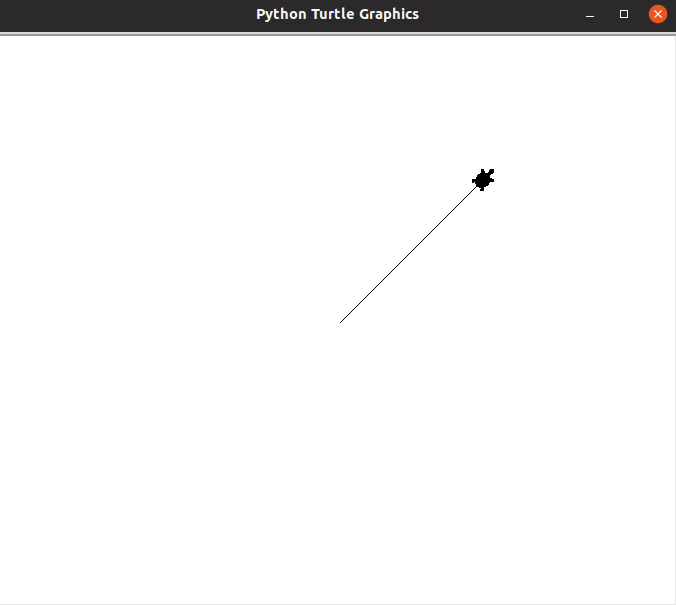
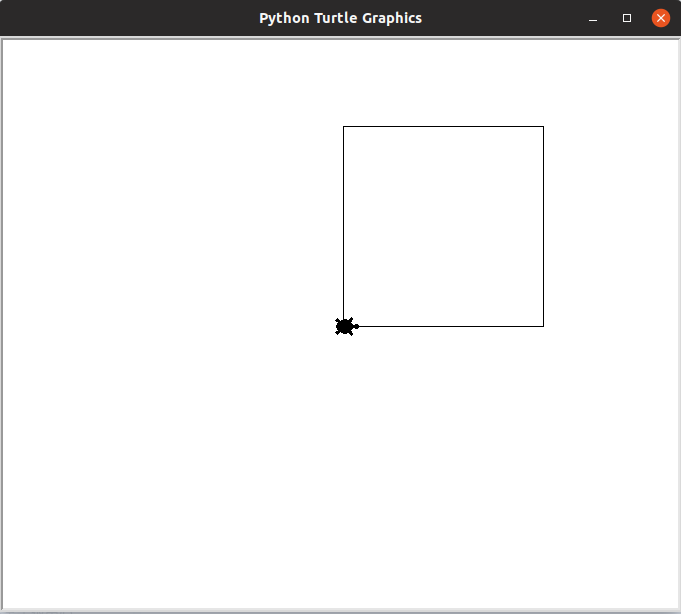
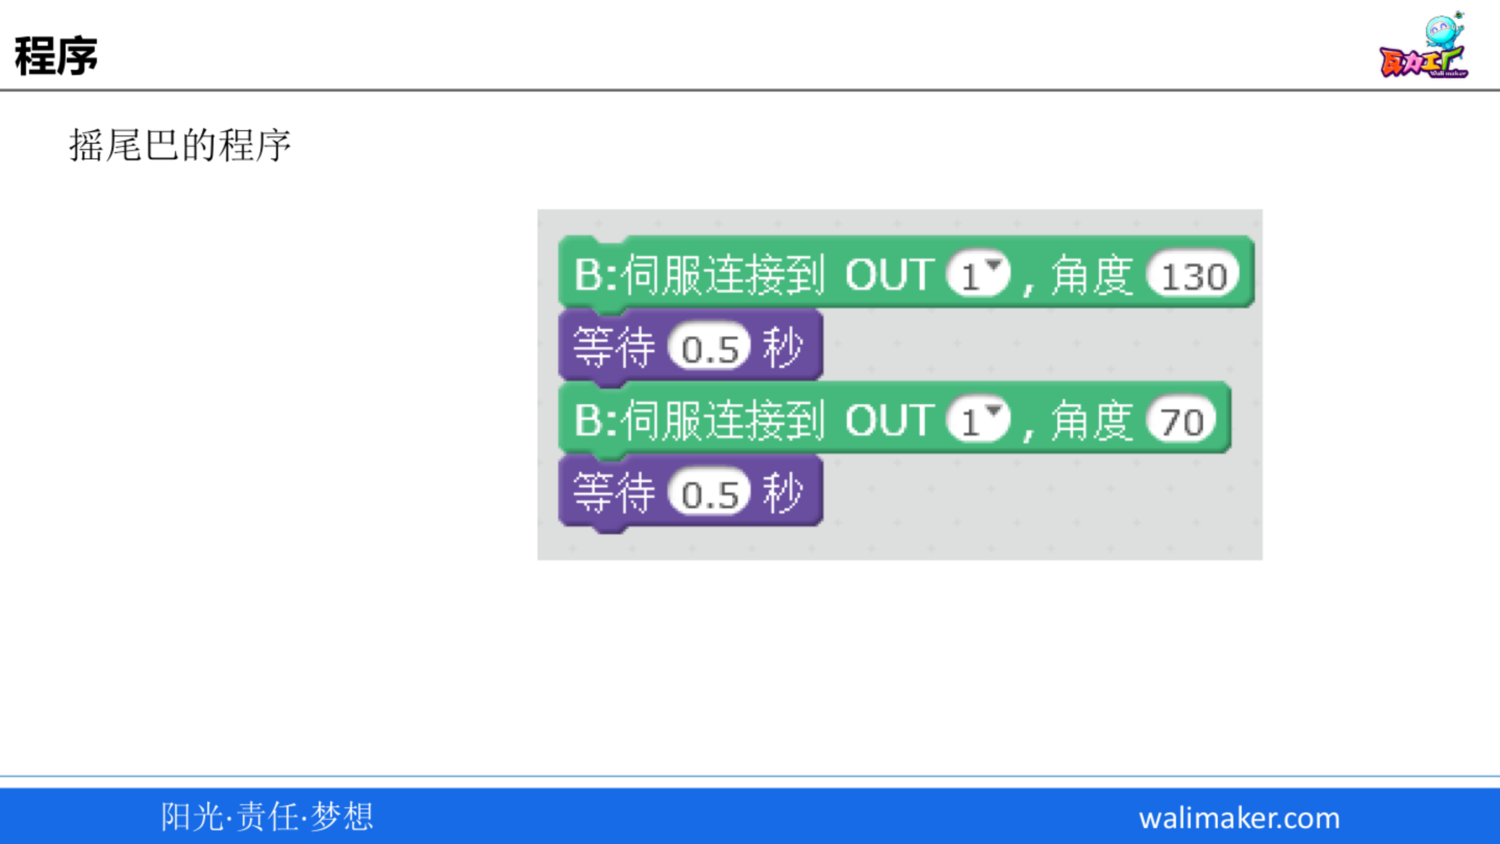
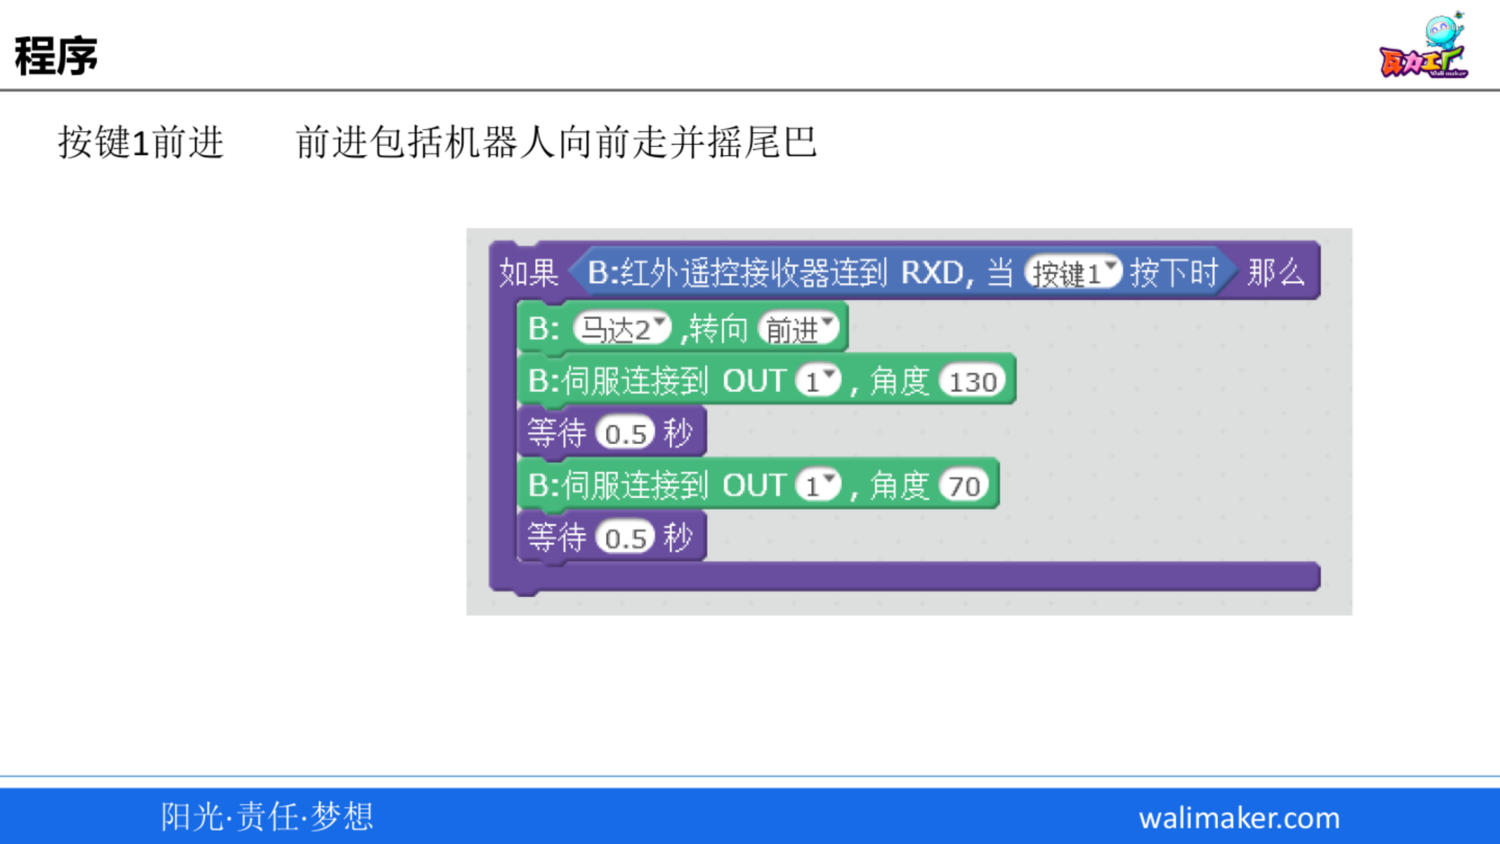
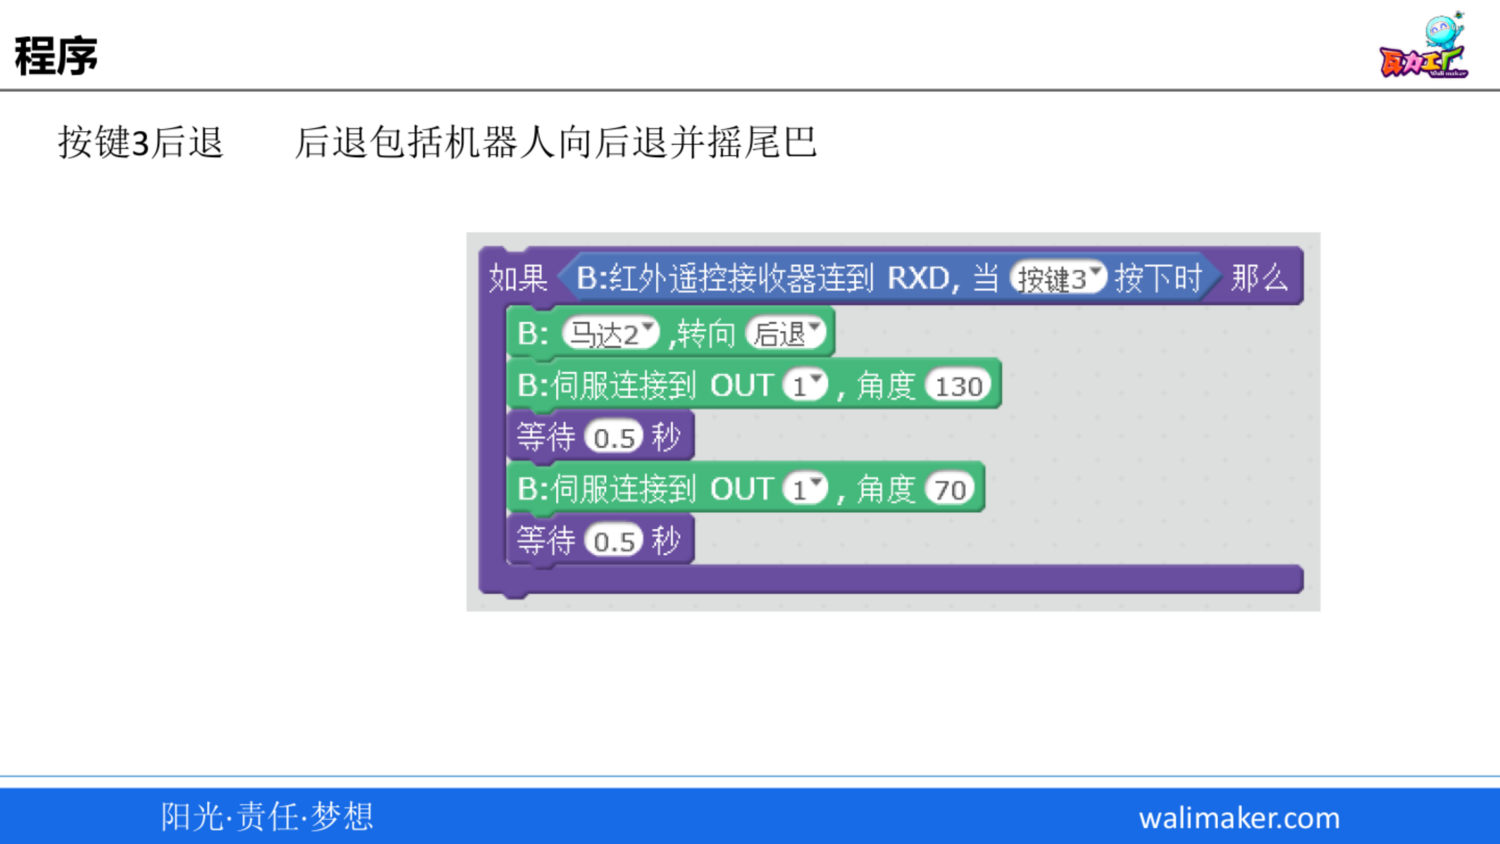
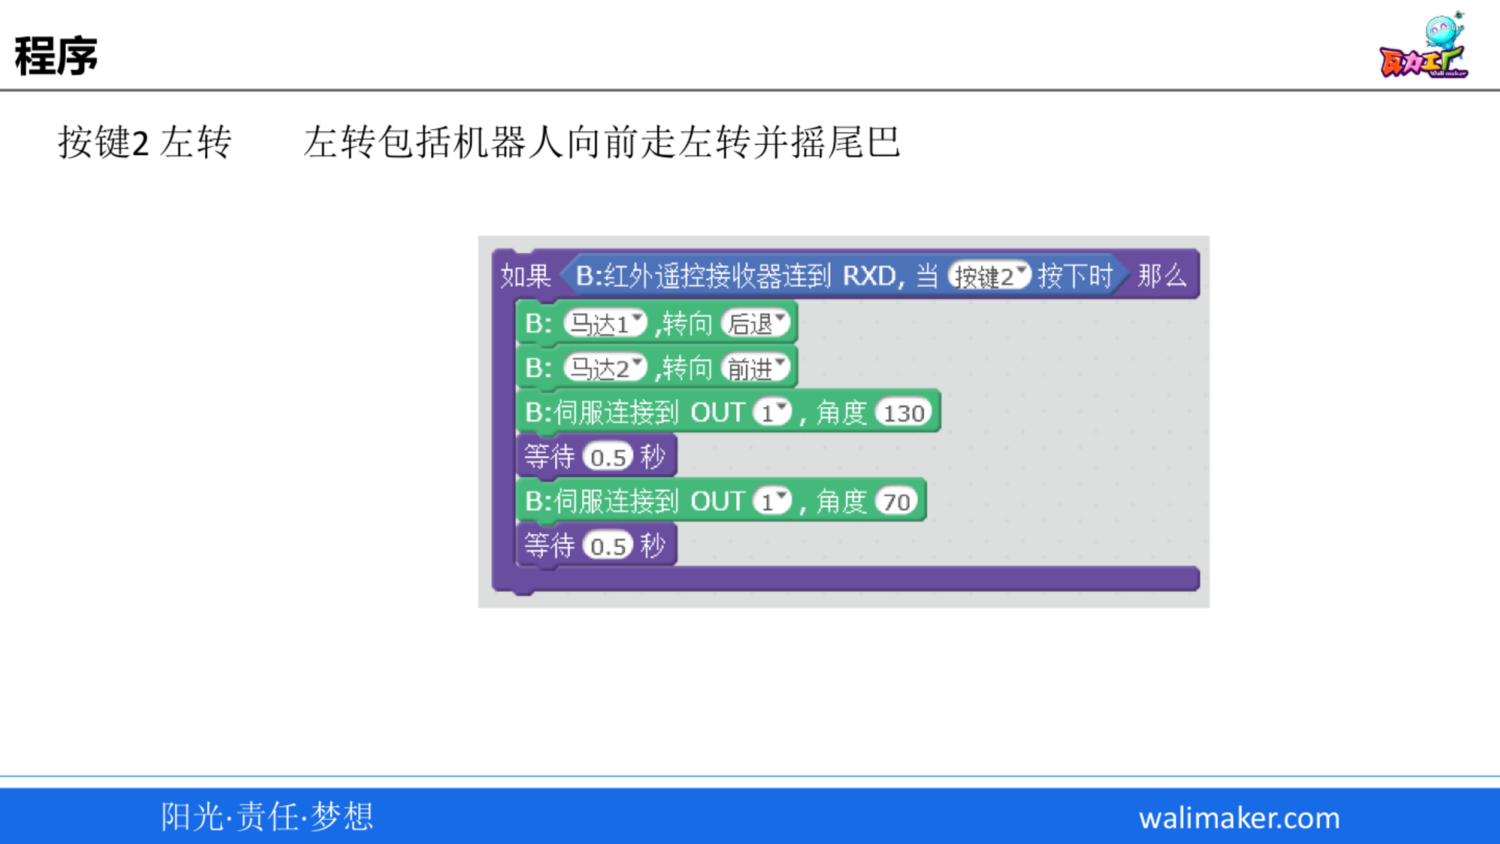
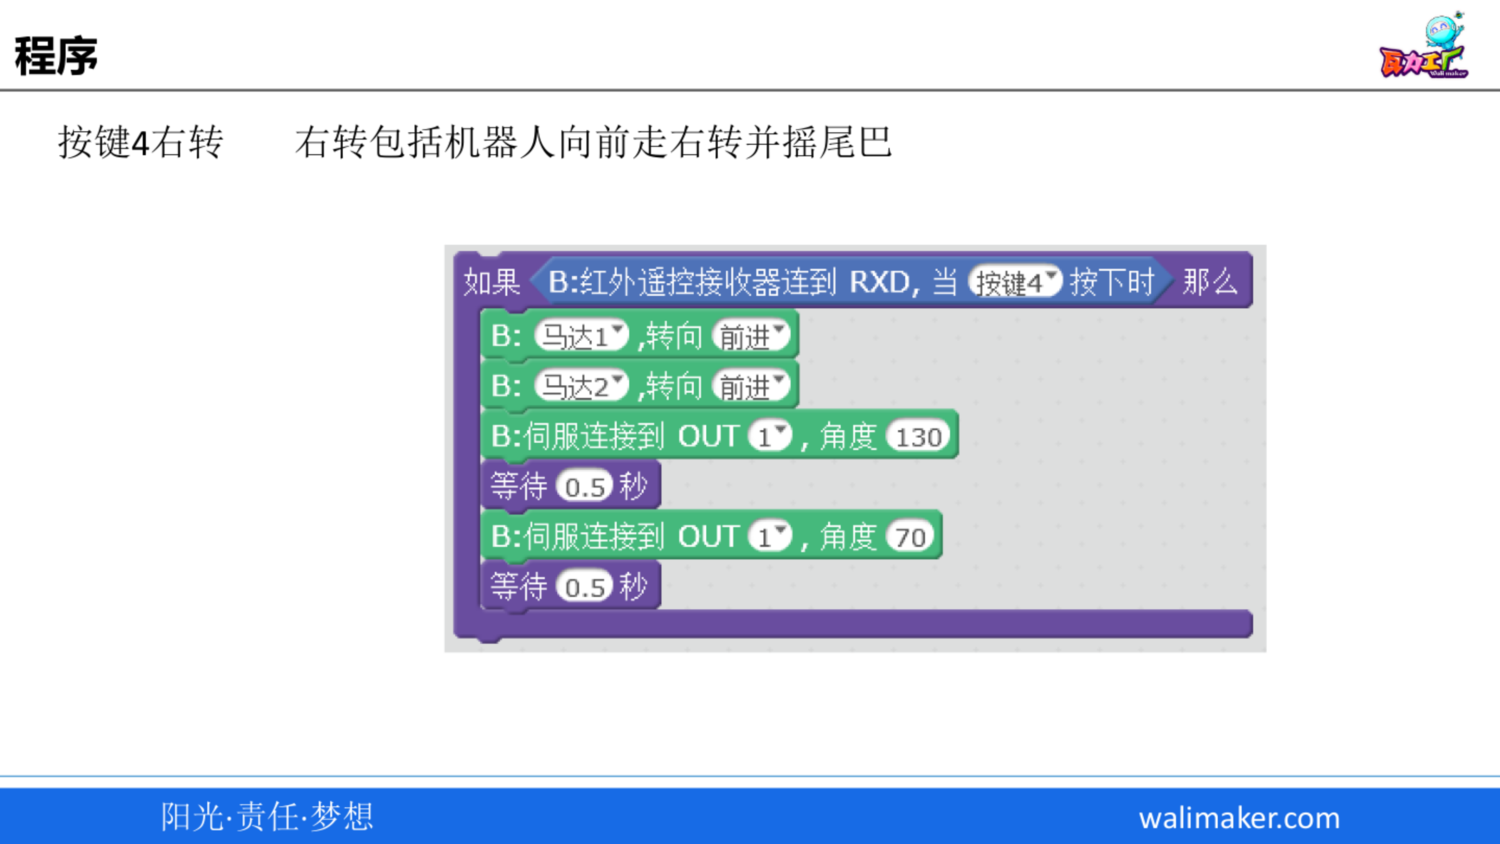
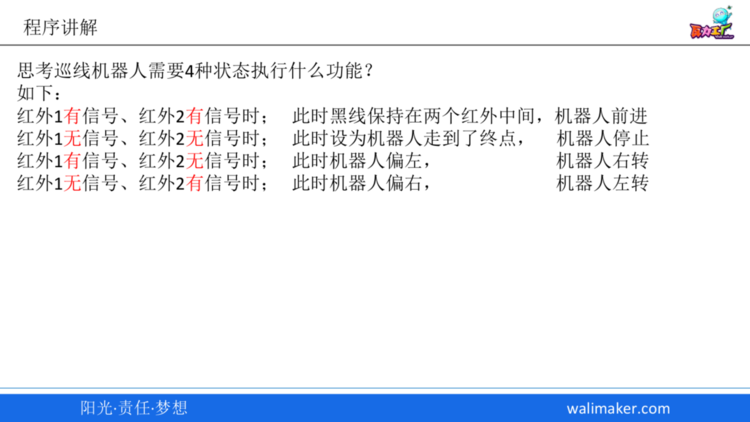
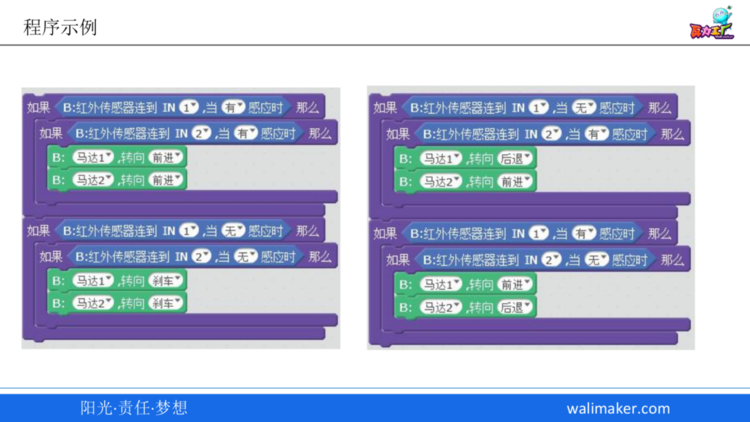
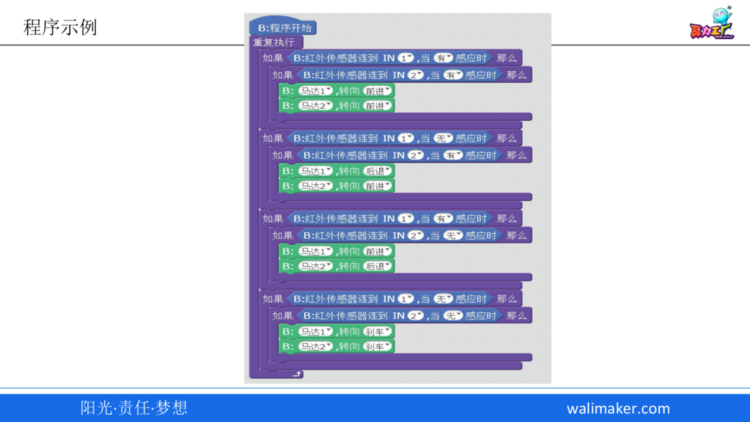
在前面的教程中,瓦力博士留了一道练习题给大家—-画正方形,相信聪明的你应该已经画出来了。


下面是瓦力博士实现的代码。 是不是跟你的代码很像呢?

1
2
3
4
5
6
7
8
9
10
11
12

import turtle

turtle.forward(200)
turtle.left(90)
turtle.forward(200)
turtle.left(90)
turtle.forward(200)
turtle.left(90)
turtle.forward(200)
turtle.left(90)
turtle.exitonclick()

虽然这段代码可以成功绘制出一个正方形,但它还有些不足的地方。仔细观察,我们发现,有许多代码是重复的:第 3, 4 行的代码重复了 4 次。在编程的时候,我们要尽量避免重复的代码。遇到需要重复执行的语句,我们应当使用循环来实现。

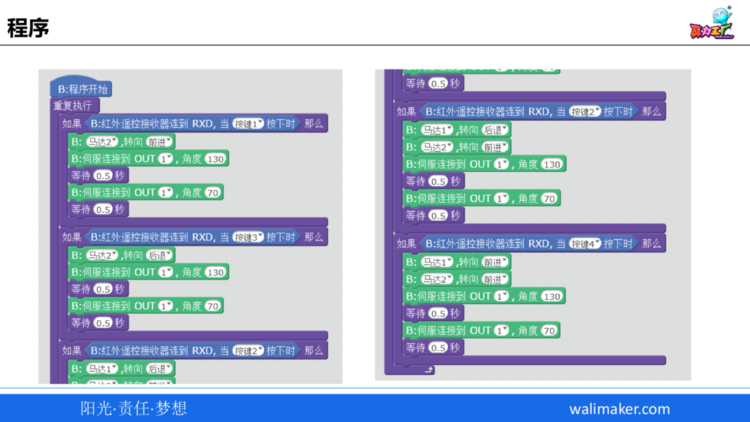
下面是瓦力博士用循环重新实现的画正方形的功能。怎么样,代码是不是简洁许多了呢?但是好像看不太懂了?

1
2
3
4
5
6
import turtle

for i in range(4):
turtle.forward(200)
turtle.left(90)
turtle.exitonclick()

第 3, 4, 5 行就是一个循环,用于执行重复的语句。

其中,第 4, 5 行的代码和原来的版本”几乎”是一样的,它们是需要重复执行的语句,我们称之为循环体。不过,一定要注意的是,同原来的版本相比,第 4, 5 行的代码不是顶格写的,而是向右缩进了一些(所以是“几乎”一样,而不是完全相同),Python 正是根据缩进来推断哪些语句属于循环体。通常我们使用连续的 4 个空格符来表示一级的缩进。

第 3 行的代码是一个 for 循环。它的作用是重复执行循环体中的语句。可是要重复执行多少次呢?答案是 4 次。为什么?我们先来看 range 函数,range(n) 相当于产生一个从 0 到 n-1 的等差数列, 即 0, 1, 2…, n-1,总共 n 个数字。所以,这里的 range(4) 相当于数列 0, 1, 2, 3,总共是 4 个数字。 for i in range(4): 的意思就是每次循环从数列中取出 1 个数字,赋值给变量 i,直至取完数列中所有的数字,即

第 1 次循环的时候,i = 0
第 2 次循环的时候,i = 1
第 3 次循环的时候,i = 2
第 4 次循环的时候,i = 3
然后呢?然后循环就结束了,因为 range(4) 对应的数列只有 0, 1, 2, 3 这 4 个数字。这 4 个数字通过 4 次循环已经全部取完了。没数字可取了,所以循环也就结束了。因此,第 3 行的代码 for i in range(4): 将执行 4 次循环体(第 4, 5 行的代码)

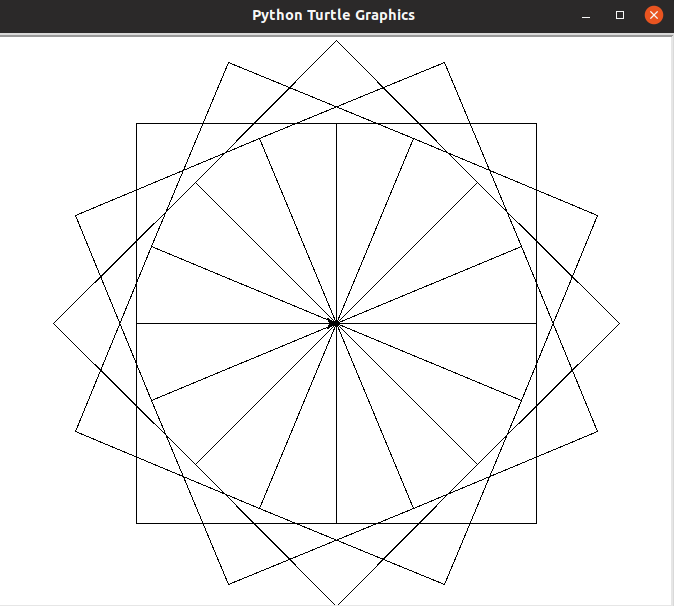
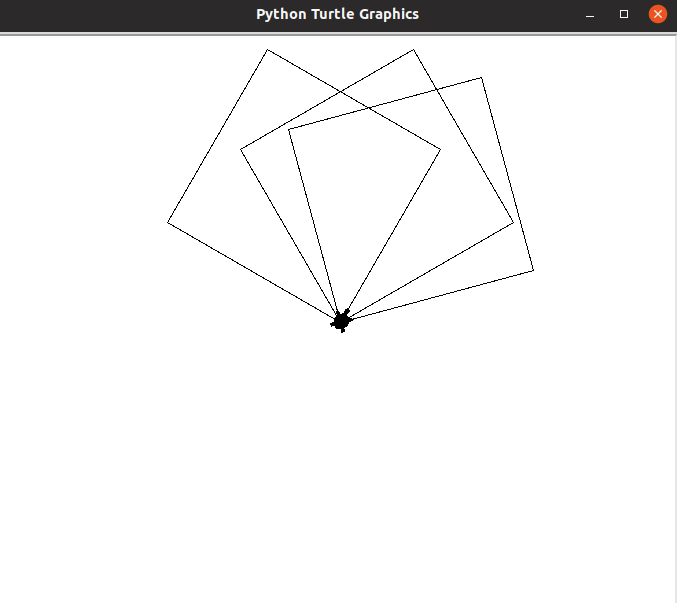
最后,瓦力博士给大家展示一个更高级一点的例子—-嵌套循环,即循环体里面还有循环!

1
2
3
4
5
6
7
import turtle
for i in range(16):
turtle.left(22.5)
for j in range(4):
turtle.forward(200)
turtle.left(90)
turtle.exitonclick()

练习

先不要运行代码,尝试分析一下,上面这段代码会绘制出什么样的图案?
让代码跑起来,看看你的分析是否正确。

Python零基础快速入门趣味教程002-变量

发表于 2018-12-24 | 分类于 Python 入门

大家在中学就已经学过变量的概念了。例如:我们令 x = 100,则可以推出 x*2 = 200

试试下面这段 Python 代码

1
2
3
4
5
6
7
import turtle
turtle.shape("turtle")
x = 100
turtle.forward(x)
turtle.left(45)
turtle.forward(2*x)
turtle.exitonclick()

运行上面的代码,小海龟将画出下面的图案:

x = 100 声明了变量 x,并将它赋值为 100,用大家熟悉的中学数学语言来说,就是“令 x 等于 100”

接下来的代码中 turtle.forward(x) 就是让海龟前进 x 个单位的距离,由于前面已经将 x 赋值为 100,所以实际上就是让海龟前进 100 个单位的距离(图像中那条较短的水平线)

类似地 turtle.forward(2*x) 就是让海龟前进 2 倍的 x 个单位的距离,即前进 2 倍的 100 个单位的距离,最终海龟会向前爬行 2 x 100 = 200 个单位的距离 (图像中指向右上方的那条较长的斜线)

提示

Python (以及大多数编程语言) 中用 * 表示数学的乘法运算,以免和字母 x 相混淆
与中学数学不同的是,Python 中的变量不仅可以用来表示数字,还可以用来表示各种非数字的东西。例如,通过 wali= turtle 你可以将咪博士变身为一只海龟,然后你就可以用wali 这个变量控制海龟画图啦。

1
2
3
4
5
6
7
8
9
10

import turtle

wali = turtle
wali.shape("turtle")
x = 100
wali.forward(x)
wali.left(45)
wali.forward(2*x)
wali.exitonclick()

练习

尝试画个房子(使用变量来完成,尝试调整变量的值,绘制出不同大小的房子)

提示

你可能会需要用到开根号的运算,引入 math 模块,然后使用 math 模块的 sqrt 方法可以进行开根号的运算。
例如,下面的代码,计算 5 的平方根,并将计算结果赋值给变量 x


1
2
import math
x = math.sqrt(5)

1
2
3
4
5
6
7
8
9
10
11
12
13
14
15
16
17
18
19
20
21
import turtle
import math
turtle.shape("turtle")
line=150
turtle.left(90)
turtle.forward(line)
turtle.left(90)
turtle.forward(line)
turtle.left(90)
turtle.forward(line)
turtle.left(90)
turtle.forward(line)
turtle.left(135)
turtle.forward(math.sqrt(2)*line)
turtle.right(90)
turtle.forward(math.sqrt(2)*line/2)
turtle.right(90)
turtle.forward(math.sqrt(2)*line/2)
turtle.right(90)
turtle.forward(math.sqrt(2)*line)
turtle.exitonclick()

Python零基础快速入门趣味教程001-神秘朋友

发表于 2018-12-24 | 分类于 Python 入门

Python 自带了一个非常有趣的 海龟绘图程序 (turtle),它是本系列课程的主角。

在 终端中输入中,新建一个项目,然后在代码编辑器中输入anaconda-navigator,启动anaconda平台,在平台上点击jupyter打开jupyter-notebooks。

1
2
3
import turtle
turtle.shape("turtle")
turtle.exitonclick()

点击 Shift+Enter 运行这段代码,便可以召唤出这位可爱的小精灵,上面的代码中 import turtle 用于导入模块,导入之后就可以应用模块的各种功能了turtle.shape(“turtle”) 调用 turtle 的 shape 方法,用于改变海龟的显示方式(默认显示的是一个三角形的小箭头)。执行这句代码之后,turtle 显示为一只形象的小海龟。turtle.exitonclick() 最后这句是告诉海龟保持住,直到遇到鼠标点击的时候才退出 (exit on click)。不然程序执行得太快,我们还来不及看到海龟,它就已经执行完毕并退出了。

提示

请不要直接复制、粘贴代码,而是要对照着代码,自己在代码编辑器中一点一点地输入
Python 是大小写敏感的编程语言,输入代码时,请务必细心,注意字母大小写
Python 相比其他高级编程语言的一个特别之处,在于强制使用缩进,请不要在每行代码的开头随意添加空白字符(空格、Tab 键等)

现在小海龟位于窗体的正中央,龟头指向右边的方向。

接下来,我们尝试让海龟走两步。

关闭窗口(或点击窗体任何位置自动退出),将编辑器中的代码,更改为下面的样子

1
2
3
4
import turtle
turtle.shape("turtle")
turtle.forward(200)
turtle.exitonclick()

我们看到小海龟从屏幕中心出发,沿着龟头的方向(右边),爬行(前进)了一段距离。

这次的代码,跟最开始的代码并没有太多的不同,只增加了 1 条语句 turtle.forward(200) 它的意思就是让海龟沿着当前龟头的指向,前进 200 个单位的距离。

刚才我们已经学会了如何让海龟爬行,接着我们再来看如何让海龟转身。

1
2
3
4
5
import turtle
turtle.shape("turtle")
turtle.left(45)
turtle.forward(200)
turtle.exitonclick()

这一次,在海龟出发之前(位于窗体正中央,龟头向右),我们先通过 turtle.left(45) 让海龟向左(逆时针)旋转 45 度。此时,海龟仍然位于窗体正中央,但龟头指向屏幕右上方。接着,再让海龟沿着更改后的龟头方向爬行,turtle.forward(200) ,于是就就画出了指向屏幕右上方的一条线段。

练习

1
2
3
4
5
6
7
8
9
10
11
import turtle
turtle.shape("turtle")
turtle.left(90)
turtle.forward(200)
turtle.left(90)
turtle.forward(200)
turtle.left(90)
turtle.forward(200)
turtle.left(90)
turtle.forward(200)
turtle.exitonclick()

1
2
3
4
5
6
7
8
9
10
11
12
13
14
15
16
17
18
19
20
21
22
23
24
25
26
27
28
import turtle
turtle.shape("turtle")
turtle.left(15)
turtle.forward(200)
turtle.left(90)
turtle.forward(200)
turtle.left(90)
turtle.forward(200)
turtle.left(90)
turtle.forward(200)
turtle.left(105)
turtle.forward(200)
turtle.left(90)
turtle.forward(200)
turtle.left(90)
turtle.forward(200)
turtle.left(90)
turtle.forward(200)
turtle.left(120)
turtle.forward(200)
turtle.left(90)
turtle.forward(200)
turtle.left(90)
turtle.forward(200)
turtle.left(90)
turtle.forward(200)
turtle.left(90)
turtle.exitonclick()

fullstack-react-native

发表于 2018-12-18

Platform specific properties

The Platform API allows us to conditionally apply different styles or properties in our component
based on the device’s operating system. The OS attribute of the object returns either iOS or android
depending on the user’s device.

Although this is a relatively simple way to apply different properties in our application based on
the user’s device, there may be scenarios where we may want our component to be substantially
different between operating systems.
We can also use the Platform.select method that takes the operating system as keys within an
object and returns the correct result based on the device:

1
2
3
4
5
6
7
8
9
10
11
textStyle: {
textAlign: 'center',
...Platform.select({
ios: {
fontFamily: 'AvenirNext-Regular',
},
android: {
fontFamily: 'Roboto',
},
}),
},

Separate files

Instead of applying conditional checks using Platform.OS a number times throughout the entire
component file, we can also leverage the use of platform specific files instead. We can create
two separate files to represent the same component each with a different extension: .ios.js and
.android.js . If both files export the same component class name, the React Native packager knows
to choose the right file based on the path extension. We’ll dive deeper into platform specific
differences later in this book.

Text input

We now have text fields that display the location, weather condition, and temperature. The next
thing we need to do is provide some sort of input to allow the user to search for a specific city.
Again, we’ll continue using hardcoded data for now. We’ll only begin using an API for real data
once we have all of our components in place.
React Native provides a built-in TextInput component that we can import into our component
that allows us to accept user input. Let’s include it within our View container underneath the Text
components (make sure to import it as well!):

1
2
3
4
5
6
7
8
9
10
<Text style={[styles.largeText, styles.textStyle]}>San Francisco</Text>
<Text style={[styles.smallText, styles.textStyle]}>Light Cloud</Text>
<Text style={[styles.largeText, styles.textStyle]}>24°</Text>
<TextInput
autoCorrect={false}
placeholder="Search any city"
placeholderTextColor="white"
style={styles.textInput}
clearButtonMode="always"
/>

There are a number of props associated with TextInput that we can use. We’ll cover the basics
here but go into more detail about them in the “Core Components” chapter. Here we’re specifying
a placeholder, its color, as well as a style for the component itself. Let’s create its style object,
textInput , underneath our other styles:

1
2
3
4
5
6
7
8
9
10
11
12
13
smallText: {
fontSize: 18,
},
textInput: {
backgroundColor: '#666',
color: 'white',
height: 40,
width: 300,
marginTop: 20,
marginHorizontal: 20,
paddingHorizontal: 10,
alignSelf: 'center',
},

As we mentioned previously, all the attributes that we provide styles with in React Native are
extremely similar to how we would apply them using CSS. Now let’s take a look at our application:

We can see that the text input has a default underline on Android. We’ll go over how to remove this
in a bit.
We’ve also specified the clearButtonMode prop to be always . This shows a button on the right side
of the input field when characters are inserted that allows us to clear the text. This is only available
on iOS.

If you’re using the iOS simulator, you can connect your hardware keyboard and use that with
any input field. This can be done with Shift + ⌘ + K or going to Hardware -> Keyboard ->
Connect Hardware Keyboard
With this enabled, the software keyboard may not show by default. You can toggle this by
pressing ⌘ + K or going to Hardware -> Keyboard -> Toggle Software Keyboard
Now every time you click an input field, the software keyboard will display exactly how it
would if you were using a real device and you can type using your hardware keyboard.

However one thing you may have noticed is that when you focus on the input field with a tap, the
keyboard pops up and covers it on Android and comes quite close on iOS:

Since the virtual keyboard can cover roughly half the device screen, this is a common prob-
lem that occurs when using text inputs in an application. Fortunately, React Native includes
KeyboardAvoidingView , a component that solves this problem by allowing us to adjust where other
components render in relation to the virtual keyboard. Let’s import and use this component instead
of View :

1
2
3
4
5
6
7
8
9
10
11
12
13
14
15
16
render() {
return (
<KeyboardAvoidingView style={styles.container} behavior="padding">
<Text style={[styles.largeText, styles.textStyle]}>San Francisco</Text>
<Text style={[styles.smallText, styles.textStyle]}>Light Cloud</Text>
<Text style={[styles.largeText, styles.textStyle]}>24°</Text>
<TextInput
autoCorrect={false}
placeholder="Search any city"
placeholderTextColor="white"
style={styles.textInput}
clearButtonMode="always"
/>
</KeyboardAvoidingView>
);
}

Notice that KeyboardAvoidingView accepts a behavior prop with which we can customize how the
keyboard adjusts. It can change its height, position or bottom padding in relation to the position of
the virtual keyboard. Here, we’ve specified padding .
Now tapping the text input will shift our component text and input fields out of the way of the
software keyboard.

Custom components

So far, we’ve explored how to add styling into our application, and we’ve included some built-in
components into our main App component. We use View as our component container and import
Text and TextInput components in order to display hardcoded weather data as well as an input
field for the user to change locations.
It’s important to re-iterate that React Native is component-driven. We’re already representing our
application in terms of components that describe different parts of our UI without too much effort,
and this is because React Native provides a number of different built-in components that you can
use immediately to shape and structure your application.
However, as our application begins to grow, it’s important to begin thinking of how it can further
be broken down into smaller and simpler chunks. We can do this by creating custom components
that contain a small subset of our UI that we feel fits better into a separate, distinct component
file. This is useful in order to allow us to further split parts of our application into something more
manageable, reusable and testable.
Although our application in its current state isn’t extremely large or unmanageable, there’s still some
room for improvement. The first way we can refactor our component is to move our TextInput intoa separate component to hide its implementation details from the main App component. Let’s create
a components directory in the root of the application with the following file:
├── components/

  • SearchInput.js
    All the custom components we create that we use in our main App component will live inside this
    directory. For more advanced apps, we might create directories within components to categorize
    them more specifically. Since this app is pretty simple, let’s use a flat components directory.
    The SearchInput will be our first custom component so let’s move all of our code for TextInput
    from App.js to SearchInput.js :
1
2
3
4
5
6
7
8
9
10
11
12
13
14
15
16
17
18
19
20
21
22
23
24
25
26
27
28
29
30
31
32
33
34
import React from 'react';
import { StyleSheet, TextInput, View } from 'react-native';
export default class SearchInput extends React.Component {
render() {
return (
<View style={styles.container}>
<TextInput
autoCorrect={false}
placeholder={this.props.placeholder}
placeholderTextColor="white"
underlineColorAndroid="transparent"
style={styles.textInput}
clearButtonMode="always"
/>
</View>
);
}
}

const styles = StyleSheet.create({
container: {
height: 40,
marginTop: 20,
backgroundColor: '#666',
marginHorizontal: 40,
paddingHorizontal: 10,
borderRadius: 5,
},

textInput: {
flex: 1,
color: 'white',
},
});

Let’s break down what this file contains:
• We export a component named SearchInput .
• This component accepts a placeholder prop.
• This component returns a React Native TextInput with a few of its properties specified
wrapped within a View . We’ve applied the appropriate styles to our view container including
a borderRadius . We also added underlineColorAndroid=”transparent” to remove the dark
underline that shows by default on Android.

this is a special keyword in JavaScript. The details about this are a bit nuanced, but for the
purposes of the majority of this book, this will be bound to the React Native component
class. So, when we write this.props inside the component, we’re accessing the props
property on the component. When we diverge from this rule in later sections, we’ll point it
out.
For more details on this, check out this page on MDN 35 .

DPJ-046-鳐鱼机器人

发表于 2018-12-18 | 更新于 2018-11-18

情景任务:

武器装备部要求瓦力工厂制造一种仿生鱼,用于侦测水下敌方的潜艇,瓦力工厂把这个光荣的任务交给我们瓦力工程师,为了保家卫国,维护世界的和平,我们瓦力工程师流点汗,加点班也没什么。技术在手,什么都有,NO Problem!

知识点拓展:

鱼身体呈流线型中间大两头小,身体表面覆盖鳞片,保护身体;鳞片表面有一层粘液,游泳时减小水的阻力;身体两侧有一行侧线,侧线和神经相连,主要是测定方向和感知水流的作用;鱼的身体长有胸鳍、背鳍、腹鳍和尾鳍是鱼在水中的运动器官;体内有鳔,主要作用是调节身体的比重,鳔在鳍的协同下,可以使鱼停留在不同的水层里。
鱼鳍的作用:背鳍和臀鳍主要在行动时起稳定作用和平衡作用。尾鳍和体侧肌肉配合,起推动鱼体和掌握方向的作用。胸鳍和腹鳍的主要作用是保持鱼体平衡,配合鱼体转向,调整鱼体升降。但胸鳍比腹鳍用途更广,可以像船桨一样,一下一下地划动,使鱼体徐徐前进。

鳐鱼,属于软骨鱼纲鳐形目 Rajiformes和鲼形鱼目,是多种扁体软骨鱼的统称。分布于全世界大部分水区,从包括2亚目,共8科约49属315种。中国产6科8属28种。我国各地俗称不一,舟山渔民称黄貂鳐叫黄虎,称蝠鲼叫燕子花鱼、黑虎、双头花鱼,称何氏鳐叫猫猫花鱼,而胶东渔民则叫劳子鱼、老板鱼。鳐鱼体型大小各异,小鳐成体仅50厘米,大鳐可长达8米。鳐鱼无害,底栖,常常部分埋于水底沙中。

任务分解:

1.需要外界能量提供动力
2.需要有伺服马达控制鱼尾游动。
3.需要控制伺服马达的指令。

器材分解:

电池盒、马达、伺服马达、CPU、触碰开关、附件

学习目标:

1.伺服马达的认识与应用.
2.伺服马达的多功能用途.
3.遥控器控制双马达分开编程。

构建步骤:


接力赛机器人程序设计:


道闸机器人已完成,有什么疑问,加老师微信进行咨询吧!

每日点滴

发表于 2018-12-18 | 更新于 2018-11-10

在Markdown中插入代码块

[title] [] [url] [link text]
1
code snippet

例子

1
alert('Hello World!');

另一种常用

三个反引号

例子

1
2
#/bin/python3
print{"helloworld"}

在markdown 插入公式

Hexo 输入数学公式主要通过MathJax 渲染LaTeX 公式实现的,具体开启步骤以及简要语法介绍如下。

安装配置

在next 主题配置文件_config.yaml 中找到 MathJax 选项,将enable 改成 true 即可:

1
2
3
4
5
MathJax Support
mathjax:
enable: true
per_page: false
cdn: //cdn.mathjax.org/mathjax/latest/MathJax.js?config=TeX-AMS-MML_HTMLorMML

页面插入

页面插入公式有两种形式,一是行内插入公式不居中显示:

1
$公式$

例如$E=mc^2$$

第二种是行间插入公式,居中显示:
例如$$S=\pi*r^2$$

语法公式

[公式]https://www.jianshu.com/p/e4d4433d418a%}

1
2
3
4
5
6
7
8
9
10
11
12
13
14
15
16
17
18
19
20
21
22
23
24
25
26
27
28
29
30
31
32
33
34
35
36
37
38
39
40
41
42
43
44
45
46
47
48
49
50
51
52
53
54
55
56
57
58
59
60
61
62
63
64
65
66
67
68
69
70
71
72
73
74
75
76
77
78
79
80
81
82
83
84
85
86
87
88
89
90
91
92
93
94
95
语法公式
关于公式的语法格式,主要有以下常用:

上下标
^ 表示上标,_ 表示下标。

$$a_{1} x^{2} $$
$$e^{-\alpha t} $$
$$a^{i}_{ij}$$
$$e^{x^2} \neq {e^x}^2$$
$$a_{1}$$

$$x^{2}$$
$$e^{-\alpha t}$$
$$a^{i}_{ij}$$
$$e{x2} \neq {ex}2$$

此外,如果左右两边都有上下标,则使用 \sideset 命令,效果如下:

\sideset{^xy}{^xy}\bigotimes
$$\sideset{xy}{xy}\bigotimes$$

平方根
平方根输入命令为 \sqrt,n次方根命令为 \sqrt[n],其符号大小由LaTeX 自动给定:

$$\sqrt{x}$$ $$\sqrt{x^2+\sqrt{y}$$ $$\sqrt[3]{2}$$
$$\sqrt{x}$$

$$ \sqrt{x^2+\sqrt{y}}$$

$$\sqrt[3]{2}$$

水平线
使用 \overline 和 \underline 分别在表达式上下方画出水平线:

$$\overline{m + n}$$
$$\underline{m + n}$$
$$\overline{m + n}$$
$$\underline{m + n}$$

水平大括号
命令 \overbrace 和 \underrace,效果如下:

$$\underbrace{a+b+\cdots+z}$$
$$\overbrace{a+b+\cdots+z}$$

$$\underbrace{a+b+\cdots+z}$$

矢量
矢量的命令是 \vec,用于单个字母的向量表示。\overrightarrow 和\overleftarrow 分别表示向右和向左的向量箭头:

$$\vec{a}$$
$$\overrightarrow{AB}$$
$$\overleftarrow{BA}$$
$$\vec{a}$$
$$\overrightarrow{AB}$$
$$\overleftarrow{BA}$$

分数
分数使用 \frac{...}{...} 进行排版:

$$1\frac{1}{2}$$
$$\frac{x^2}{k+1}$$
$$x^{1/2}$$
$$1\frac{1}{2}$$
$$\frac{x^2}{k+1}$$
$$x^{1/2}$$

积分运算符
积分运算符使用 \int 生成。求和运算符使用 \sum 生成。乘积运算符使用 \prod 生成。上下限使用^ 和_ 命令,类似 上下标:

$$\sum_{i=1}^{n}$$
$$\int_{0}^{\frac{\pi}{2}}$$
$$\prod_\epsilon$$
$$\sum_{i=1}^{n}$$
$$\int_{0}^{\frac{\pi}{2}}$$
$$\prod_\epsilon$$

希腊字母
$\alpha$ \alpha $\beta$ \beta $\gamma$ \gamma $\delta$ \delta $\epsilon$ \epsilon

字体转换
要对公式的某一部分字符进行字体转换,可以用{\rm需转换的部分字符}命令,其中\rm可以参照下表选择合适的字体。
一般情况下,公式默认为意大利体。

\rm 罗马体 \rm test \it 意大利体 \it test

\bf 黑体 \bf test \cal 花体 \cal test

\sl 倾斜体 \sl test \sf 等线体 \sf test

\mit 数学斜体 \mit test \tt 打字机字体 \tt test

\sc 小体大写字母 \sc test

日积月累

发表于 2018-12-18 | 更新于 2018-11-10

瓦力币的含义

红色:比赛
绿色:团队
蓝色:动手
黄色:语言
紫色:全勤

遥控板连接

6按键遥控接收板印有红框内标记的 ”瓦力工厂“ 字样!接收板连接到接收板的 “RXD” 引脚位置

批量缩小图片

发表于 2018-12-18 | 更新于 2018-11-19

驱动需求:

最近做了一段时间教程,发现做的网站打开非常慢,打开单张图片的属性一看,竟然每张都1-2M,网站打开不满才有问题呢?于是在网上找批量压缩图片的软件。

功夫不负有心人,终于找到了 imagemagick

先来看看 ImageMagick 能做些什么:
1、批量旋转、分割,并顺序编号
2、自动批量切除白边(auto-crop)
3、自动倾斜校正(deskew)
4、批量加标注
5、批量去标注
6、批量加水印
7、批量去水印
一、最基本的格式转换
下面,我将结合与扫书制书有关的图像操作,来说明 IM 的用法。

前面已经说过,IM 由一组命令行工具组成,具体来说也就是 convert、mogrify、composite、montage、identify、compare、display、animate、stream、import 和 conjure,这 11 个命令。

其中最常用的,是 convert 和 mogrify。

1、将 a.gif 转为 png 格式
convert a.gif a.png
请注意,convert 命令的基本格式为
convert 源文件 [参数] 目标文件
在上面的命令中,源文件是 a.gif,目标文件是 a.png。由于这是最简单的格式转换,所以不需要中间的参数。
convert 常用于单个文件的转换。上面的命令是它最基本的用法。

前面说过 IM 支持超过 100 种的文件格式。
下面的命令,可以列出 IM 所支持的所有格式:
identify -list format

2、批量文件的格式转换

mogrify -path newdir -format png  *.gif

这个命令的作用,是将当前目录下的所有 gif 文件,转换为 png 格式,并将其存放在 newdir 目录下。

mogrify 是用于批量处理文件的命令。它的基本格式是这样的:
mogrify 参数 源文件
mogrify 支持基本的通配符,例如你可以用 a*.png 指代所有以 a 打头的 png 文件,诸如此类。

再回到刚才的命令:

mogrify -path newdir -format png  *.gif

这里的 -path 和 -format 是两个可选择的参数。
-format 指定输出的文件格式,而 -path 则指定输出的文件目录。

我在这里先强调一下:如果不加 -path 参数的话,mogrify 有可能会覆盖你的源文件,因此强烈推荐在每个 mogrify 命令里都加上 -path 参数,并在执行之前,先检查整个命令正确性。

二、图像的缩放:使用 -resize
IM 有好几种缩放图像的方法,在这里我只讲最基本的 resize 命令。

将一个200x304大小的图像缩小为100x152(长宽各缩短一半)。

convert page200.png -resize 100x152 page100.png

上面的 100x152,指定了目标文件的长和宽。

你也可以只指定目标文件宽度,这样它的高度会等比例放大:

convert page200.png -resize 100 page100.png

或者只指定高度:

convert page200.png -resize x152 page100.png

以上三句命令,其结果都是一样的。

你可以用 identify 命令来显示图像的尺寸以及其它一些信息:
identify page100.png
其结果为:

page100.png PNG 100x152 100x152+0+0 8-bit DirectClass 17.9kb

最后,你还可以通过指定百分比来缩放图像:

convert page200.png -resize 50% page100.png
convert page200.png -resize 150% page300.png

批量缩放图像

mogrify -path newdir -resize 200% *.png

这句命令的意思是将当前目录中所有的 png 文件都放大一倍,并存放到 newdir 目录中。

改进

就这样一行命令就实现了图片的压缩,试了一下,大概压缩到200K左右,清晰度还能满足要求。
但是,这样的命令行只能进行当前文件夹的图片压缩。和linux -R 递归参数并不匹配。
最后用 Bash程序解决

1
2
3
4
5
6
7
 #!/bin/bash
echo "resize image who is bigger than 200k";
for i in `find . -size +200k`;
do
convert $i -resize 40% $i;
echo "resize image $i to 40%";
done

只能说,编程让生活如此简单!

有什么疑问,加老师微信进行咨询吧!

DPJ-026-双寻线机器人

发表于 2018-12-18 | 更新于 2018-12-02

情景任务:

双11刚刚过去,瓦力工厂就接到一个任务,那就是为明年的双11设计自动送快递的小车,因为双11实在是太火爆了,快递员夜以继日的送快递都不能把快递送完,有的快递员都累病了。这个任务就交到了我们伟大的瓦力工程师手里,对于这样的问题,我们瓦力工程师只能说NO Problem!

知识点拓展:

红外避障传感器基本原理:

利用物体的反射性质。在一定范围内,如果没有障碍物,发射出去的红外线,因为传播距离越远而逐渐减弱,最后消失。如果有障碍物,红外线遇到障碍物,被反射到达传感器接收头。传感器检测到这一信号,就可以确认正前方有障碍物,并送给单片机,单片机进行一系列的处理分析,协调小车两轮工作,完成一个漂亮的躲避障碍物动作。

巡线机器人的实现原理

  由于黑色具有较强的吸收能力,当循迹模块发射的红外线照射到黑线时,红外线将会被黑线吸收,导致循迹模块上光敏三极管处于关闭状态,此时模块上一个LED熄灭。在没有检测到黑线时,模块上两个LED常亮。

任务分解:

1.需要外界能量提供动力
2.需要有轮子(为什么呢?观察生活)
3.需要有前进、转弯、停止的控制方法(不能手动)

器材分解:

电池盒、马达、轮子、CPU、红外避障传感器、附件

学习目标:

课程目标:
1.了解双巡线。
2.红外传感器搭建与调试。
3.双红外线巡线编程逻辑。
4.培养孩子发现问题,分析问题,解决问题,动手搭建能力。

构建步骤:


接力赛机器人程序设计:


双巡线机器人已完成,有什么疑问,加老师微信进行咨询吧!

接力赛机器人

发表于 2018-12-18 | 更新于 2018-11-10

情景任务:

瓦力工程师接到一个新任务,新年快要到了,瓦力工厂要求瓦li工程师为新年增加气氛。组织一场新年接力赛。要求我们瓦力工程师为接力在设计机器人。

任务分解:

1.需要外界能量提供动力
2.需要有轮子(为什么呢?观察生活)
3.需要有前进、停止、的控制方法(不能手动)

知识点拓展:

接力跑,是田径运动中唯一的集体项目。以队为单位,每队4人,每人跑相同距离。其起源有多种说法,有的认为起源于古代奥运会祭祀仪式中的火炬传递,有的认为与非洲盛行的”搬运木料”或”搬运水坛”游戏有关,也有的认为是从传递信件文书的邮驿演变而来。
接力跑引入体育比赛,不只是田径项目,在不少其他体育活动中也有类似的比赛。就田径而言,其起源是诸说不,主要有
两种说法:
一种说法是由非洲黑人接力运送木材演变而来的。非洲人在茂密的森林中砍伐木料后,道路崎岖,运送困难,于是采用了接力的方法。搬运过程中,彼此进行速度比赛,看谁搬的快,运的多。
另一种说法是在十七世纪时,葡萄牙一艘军舰外出,水兵上岸游玩,发现当地居民聚在一起进行一种有趣的游戏。参加者分成若干组,每组4人,每组有一人拿着空坛,比赛开始后,持空坛的人迅速跑向50米外的水坛,将水倒人空坛,然后拿着空坛跑回交给本组第二人。如此循环往复,直到全组跑完,最先跑完者获胜。葡萄牙水兵将这种游戏带入欧洲,并加以改变,以木棒代替空坛,很快就成为学校中的一项活动,以后又演变成田径运动中的接力赛。

器材分解:

电池盒、轮子、CPU、触碰开光、附件

学习目标:

课程目标:
1.了解接力赛的起源
2.根据接力任务自主搭建机器人
3.综合使用学习的编程模块自主编程

构建步骤:


接力赛机器人程序设计:


接力赛机器人已完成,有什么疑问,加老师微信进行咨询吧!

1…891011

王俊杰

点点滴滴在编程

105 日志
12 分类
RSS
Links
  • Title
© 2019 王俊杰
由 Hexo 强力驱动 v3.4.4
|
主题 – NexT.Muse v6.5.0